Twitter RSS
magnify
formats

First steps to create a website with Blackfoot

Published on October 6, 2011 by in General

Moving in to your new home on the Internet


Uploading website content to your Blackfoot Hosting Account is a simple process. Once your hosting account with us is ready to use you will receive a welcome email with your accounts’ details. You can then upload the website contents or a holding page from your computer to the server using any of the following.

Read more…

Multiple ways to upload your content to the Web!


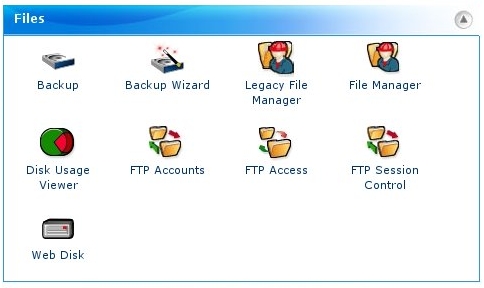
  • File Manager within the hosting account control panel (http://www.yourdomain.co.uk/cpanel)
  • An FTP client using the settings provided in your hosting account welcome email.
  • Web Disk (Web Dav) which allows you to access your hosting account as you would a drive on your computer. Please see the web disk section of the control panel.
Control Panel File Management Tools
The file management section in the Hosting Account Control Panel


The Golden Rule


Files that you want to be publicly accessible (i.e. live on the web) should be uploaded into the public_html folder.

  • If you are using ‘File Manager’ you will need to select the public_html folder from the options and then you can upload the contents using the ‘UPLOAD’ button at the top. Please see our File Manager Video Tutorial
  • If you are using an FTP client you will need to enter the details like FTP host, username, password and directory name. You will find these details in the welcome email and as mentioned the directory name for public website content should be ‘public_html’. If you want to create a separate FTP account to the one provided in your welcome email you can do so using the ‘FTP Accounts’ section within the hosting account control panel. Please see our FTP Knowledgebase Section for further information.
  • If you are using Web Disk please drag / cut and paste your files into the public_html folder.

How should I name my home page?


Our systems will attempt to load a number of different index file names as the ‘home page’ for your website, including index.htm / index.html and index.php along with various other filetypes including variants of home and default filenames) and will display the first page name that matches. For the full list of files the server will attempt to load please see the relevant knowledgebase article.

After uploading your website content or holding page you can view this on the web at http://www.yourdomain.co.uk (provided the domain is pointing to your Blackfoot Server). Otherwise you can view it at http://yourblackfootservername.com/~username/

We hope the above demonstrates how easy it is to upload website content or a holding page to a Blackfoot Account, however if you need any help regarding adding content to your account please contact us via your billing account

 
 Share on Facebook Share on Twitter Share on Reddit Share on LinkedIn
No Comments  comments 
formats

Email Authentication

Published on August 26, 2011 by in Email, General

The email authentication section of the hosting account control panel is something of a hidden gem. Email authentication is important as it addresses one of the major problems related to email sending technology, allowing recipient systems to verify whether a message has actually been sent by the domain in the ‘from’ field. Blackfoot provides the following two methods of email authentication to help allow recipient servers identify any spam, spoofing and phishing email that is forged to appear to come from your domain name.

Read more…

  1. DomainKeys
  2. SPF

You can enable these using ‘Email Management Tools’ within the account control panel which can be accessed at http://www.yourdomain.co.uk/cpanel

Email Management Tools, Email Authentication

When SPF (Sender Policy Framework) is enabled recipient servers can verify that the mail server sending the messages is listed by the domain owner as legitimate to send emails from the domain name that displays as the sender of the message. Provided that you send all email from your domain via the SMTP server provided with your Blackfoot account (or have added all the servers you use to send mail from your domain to your SPF record ) we would advise that the ‘All’ option be selected.

When DomainKeys is enabled, a digital signature (a key) will be added to the header of the message and recipient servers can then perform a DNS look-up to verify that the digital signature is authentic. DomainKeys will be replaced in the near future with the more recent DKIM method.

These methods allow recipient servers to confidently reject messages not sent via your account with ourselves and to confidently deliver your own messages directly to the recipients inbox.

Email Authentication Enabled


 Share on Facebook Share on Twitter Share on Reddit Share on LinkedIn
No Comments  comments 
formats

Simple tips to avoid junk email

Published on August 16, 2011 by in Email


Spam is unfortunately a fact of life on the internet, in July 2011 around 78% of all email consisted of junk messages. This figure has amazingly in the past been as high as 90%

Whilst there are a number of clever technical measures (such as ‘RFC-compliant HELO checking’) going on behind the scenes at the mail server level to reduce the amount of obvious spam that reaches your Blackfoot mailbox, there are also steps you can take as an end user to reduce your exposure.

Read more…

1. Apply WHOIS privacy to your domain name.


If you have registered a .com/.net/.org domain name, then the email address supplied on registration will be published in the public WHOIS database. Spammers have been known to harvest these records. For customers who do not wish WHOIS details to be public we offer a ‘WHOIS protect’ addon for these domains at a cost of £10/year. This will place a set of generic contact details in the public WHOIS database rather than your own.

Whois Protect

2. Be careful where you use your email address.

It is best not to post your full email address on your website / online generally as this can be easily harvested by spammers and their automated programs. Instead if you don’t have one already consider creating a contact form on your website, click here for further details.

Similarly when giving your email address to websites (such as when you sign up for newsletters), be careful to look out for any tickbox related to permission to pass your details to third parties as agreeing will often increase the amount of unwanted email you receive.


3. Setup forwarders for specific purposes.

Create your main email account and then consider creating disposable forwarders to it in the hosting account control panel for specific websites or purposes (forums@yourdomain.com popularauctionwebsite@yourdomain.com) should you find that one of your forwarders is suddenly receiving large amounts of spam, you can delete it and create another updating only those websites you wish to still receive messages from with the new value. This method can over time help you to avoid your main email address receiving large amounts of junk, whilst retaining the same main email address for your most important contacts.

Forwarders

4. Never click links in spam email.

Whilst legitimate newsletters from reputable organisations should always have an unsubscribe link or email address, clicking a link in an unsolicited / malicious message or replying to it can indicate to the sender that the email address is live and someone is looking at the messages, often leading to you receiving more spam. Similarly links in spam email can direct to malware which can silently harm your computer.


5. Never open files attached to spam emails.

As above, files attached to spam message can sometimes be malware or viruses. In the worst case opening a malicious attachment could lead to your computer itself being used to send spam. We’d advise always having up to date AntiVirus software installed, especially as some very good scanners are now available for free. Be aware however that even with AV installed, you are not 100% safe and should still exercise caution. If you receive an unsolicited email containing for example, a .zip file with purported new settings for Outlook, be suspicious!


6. Enable SpamAssassin

SpamAssassin (SA) is a feature included with every Blackfoot Hosting account and can be enabled in the email section of the hosting account control panel. When SpamAssassin is enabled, it will attempt to determine via a variety of measures whether an incoming message is spam and will assign it a score based upon it’s probability of being junk.

SpamAssassin

The Spam Assassin section of the control panel has some useful features

  • Messages identified as spam can be delivered to their own folder (the spam box). You’ll need to subscribe to this new folder in your email client and empty it regularly.
  • Once you’re comfortable that SA is not mistakenly classifying email you wish to receive, you could enable auto-deletion of spam messages (I personally prefer to empty my spam folder manually).
  • If you wish to white list or black list certain addresses, this is possible in the SA configuration section.


If you are ever in any doubt as to whether an email you have received appearing to be from Blackfoot actually is, please feel free to forward it to support at blackfoot.co.uk and we will be happy to check this for you. A record of all emails sent by our billing system (welcome emails / invoices etc) is available within your billing account.

 
 Share on Facebook Share on Twitter Share on Reddit Share on LinkedIn
No Comments  comments 
formats

New Feature: Timed Autoresponders

Published on August 3, 2011 by in New Features

It’s my pleasure today to introduce a new feature. When creating an autoresponder in your Blackfoot hosting account control panel, it is now possible to set a date and time for the autoresponder to start and stop.

Adding a time limited autoresponder

This feature has been requested a number of times by clients via the helpdesk, so if you have any comments or queries, please let us know!

 
 Share on Facebook Share on Twitter Share on Reddit Share on LinkedIn
No Comments  comments 
formats

Domain Renewals

Published on July 19, 2011 by in Domains

Domain Renewals


We regularly receive all kinds of queries relating to the renewal of domain registrations, so here are a few hints and pointers on the process of renewing your domain.


General


We issue invoices for domain renewals by email 45 days prior to the domain’s due date - The renewal can be paid at any time between the invoice being issued and the due date.

Your invoice will contain a payment button if WorldPay or PayPal are your chosen payment method, or payment details for bank transfer/cheque payments. All invoices also contain a manual payment link which can be used to submit a card payment. Alternatively, you can view and pay any outstanding invoices at any time through your billing account at: Read more…

https://secureuk.net/billing


.uk domains


UK domains are always registered and renewed for a period of 2 years. You should ensure your renewal is paid by the domain’s due date, Nominet (the .uk domain registry) do allow a grace period following a domain’s expiry however if you do not renew your domain by it’s expiry date you will be contacted directly by Nominet letting you know the domain has expired and advising you to contact us.


.com/net/org/biz/info domains


International domains can be registered/renewed for 1, 2, 4, 5 or 10 years, with discounts for longer registrations. By default your renewal will be raised for the same period the domain was originally registered for (ie a 2 year original registration will result in a 2 year renewal when it is due) however if you would like to renew the domain for a longer or shorter period, simply let us know and we’ll re-issue the renewal.

The registry for the above domains does not provide a grace period following a domain’s expiry - This means if you do not renew the domain by it’s renewal date the domain will be suspended immediately and no longer work until the domain is renewed.

The domain can still be renewed at it’s normal cost for approximately a month following expiry. After this month however, the domain will enter a redemption state for roughly a further 2 months, and renewing the domain once this has happened will involve a very high fee paid to the registry (this is not charged by us!) of roughly £170 plus VAT as well as it’s normal renewal cost, so please do not let a domain go unrenewed if you do wish to keep it!


Avoiding scams


Several businesses, most notably the “Domain Registry of America” and “Domain Renewal Group” operate speculative invoicing where they will use publicly available whois details for .com/net/org/biz/info domain registrations to send the domain’s owner an invoice a few months before the domain’s expiry date. While the invoice will state in its’ small print that you would be paying for a (very expensive) transfer of the domain to a new registering agent and then renewing the domain, these invoices are designed to look like a renewal invoice that must be paid in order to keep your domain.

Any domain registered with us will be invoiced for renewal by us 45 days prior to expiry by email and will be clearly labelled as an invoice from Blackfoot Hosting Limited - Any invoice sent to you for domains held with us from anyone else should be ignored.

For the security of your domains all .com/net/org/biz/info domains registered through us are locked to prevent transfers by default so these cannot be accidentally transferred to a third party, the domain must be explicitly unlocked for transfer by you via your billing account in order to authorise any transfer. You should however always be careful with paying renewal invoices, as paying anyone other than ourselves for domains held with us will not actually renew your domain and you may struggle to claim a refund!

If you are ever unsure about the validity of any renewal invoice you have received for a service held through us, please simply contact us via our helpdesk.

 
 Share on Facebook Share on Twitter Share on Reddit Share on LinkedIn
No Comments  comments 
formats

Back to basics - Email

Published on July 8, 2011 by in Email

Email Clients

==========

Email communication is one of the inevitable modes of communication in today’s world. There are different ways to send and receive emails. You can send / receive emails either using webmail which is provided with your hosting account or via an email client. If you would like to use an email client you will need to install it on your computer. Windows Live Mail, Microsoft Outlook Express, MS Outlook, Mozilla Thunderbird and Eudora are some of the commonly used email clients. You will then need to configure the email account within the email client in order to access your emails. One of the main advantages of using email clients is that your messages are stored on your computer so you can work with it offline. You can also configure multiple mail accounts within an email client.

Read more…

For example if you want to create and configure an email account example@domainname.com with password yourpass for a domain domainname.com which is hosted with us. You can create and configure this mail account using ‘Email Management Tools’ -> ‘Add / Remove E-mail account(s)’ within the account control panel. Once you have created the mail account, you can click on the ‘More’ option for the mail account example@domainname.com. You will then need to select the appropriate configuration file from the list. You can also configure the mail account by adding it manually to the email client. There is some information that you have to enter while configuring the mail account.


Username: example@domainname.com

Password: yourpass

Incoming mail server: mail.domainname.com

Outgoing mail server: mail.domainname.com


You can select either POP3 (with / without SSL) or IMAP (with / without SSL) as the incoming mail severs and SMTP (with / without SSL) as the outgoing mail server. Please ensure that you have enabled the ‘SMTP Authentication’ for the outgoing SMTP mail server. You will need to enter the corresponding ports in the settings page within the mail client.


POP3 110

POP3 with SSL 995

IMAP 143

IMAP with SSL 993

SMTP 25 or 26

SMTP with SSL 465


Once you have configured the email account you can send / receive emails using your email client.


Problems related with email clients:

If you are having connection issues you can investigate it by running the following commands at your computer’s command prompt:


A. Unable to send mails:

telnet mail.domainname.com 25

If you get 3 lines of text each beginning “220”, this indicates that your computer itself is able to establish a connection to our servers. You can then try to send mails by disabling the antivirus software installed on the system as it may be interfering with the connection. You can also try to recreate the mail accounts within the email client.

If the command returns a timeout or connection failure message, your ISP may be blocking access to port 25 so you can try the command given below

telnet mail.domainname.com 26

If the connection is successful you will get 3 lines of text as mentioned before. If this is the case you will need to change the SMTP port to 26 within the email client.

If you are still getting connection failure you will need to contact your ISP as the problem seems to be at their end.


B. Unable to receive emails:

If you are unable to receive emails you can check the connection by entering the commands given below

telnet mail.domainname.com 143 (if you are using IMAP)

telnet mail.domainnmae.com 110 (if you are using POP3)


Duplicate emails while downloading the mails from server

If you are using POP3 you will get duplicate emails if you have selected ‘leave a copy of the message in the server’ option within the email client. You can either uncheck that box or change to IMAP.


 Share on Facebook Share on Twitter Share on Reddit Share on LinkedIn
No Comments  comments 
formats

Installing Scripts with ‘Site Software’

Published on July 2, 2011 by in Scripts

If you’re relatively new to the world of the web and want to add a blog, gallery, guestbook or shopping cart to your website the level of choice and the complexity involved in setting one up can be quite startling.

In order that you can quickly trial the most popular scripts every Blackfoot hosting account has a ‘Site Software’ section, which allows you to install many popular scripts such as WordPress, Gallery and OSCommerce quickly and easily.

The ‘Site Software’ section can be found in the ‘Software’ section of the hosting account control panel.

There are several categories, such as ‘Blogs’, ‘Ecommerce’, ‘Gallery’ etc to help you find what you want. Most of the software is free to use, however any that do require a license key will inform you once you’ve clicked through to their information page. Read more…

When installing a script from Site Software, you’ll generally need to provide:

- An admin username and password (you’ll use this to access the script’s administration area). We’d advise not to use your control panel username and password.
- A location to install the script. It’s fine to use the default, which will install the domain to a folder within your account, resulting in an address of, for example www.yourdomain.com/wordpress/ Remember not to choose a location that already has files in it you want to keep!

Many of the scripts require a database, however all of our current hosting packages provide at least one, so don’t let this put you off. The database will be created for you and the necessary configuration files created behind the scenes when you click install.

Once the install is complete you’ll be provided with a link to the installed script / it’s admin area.

Time to upgrade?

Your control panel will notify you if there are updates available to any scripts you have installed. It’s important to apply the updates as soon as possible to protect your website and the security of your account. When an upgrade is available an option to action the upgrade will be provided on the page for the relevant script in ‘Site Software’.

Two Golden rules for upgrading scripts

- Your script might also notify you an upgrade is available in it’s admin area. Always upgrade the script with the same tool you installed it. For the purposes of this article as you installed your script via ‘Site Software’ to prevent things from breaking you’ll need to upgrade it there too. Once you’ve learned about the script and got to really love it, If you do want to upgrade it manually for greater control, please let us know so we can remove the reference to the install in Site Software
so the control panel doesn’t nag you about an upgrade you’ve already made.

- Always take a backup before making an upgrade. It’s a fact of life that software changes and you may in rare cases find you have a need to revert to the previous version. Backups can be taken at any time via the ‘Backups’ section of the hosting account control panel.

Getting help with scripts

We like to consider ourselves pretty knowledgeable (and modest too, as there is always more to learn!), however the absolute experts on a script will always be the developers. You’ll find a link to the developer’s website at the top of the page for each script in ‘Site Software’ and this is often an invaluable resource in learning how to use the script. For example the ‘Docs’ (link http://codex.wordpress.org/) section of the WordPress.org site is a veritable treasure chest of useful information.
The developer’s website can also be a good port of call if you want to find a consultant to make special customisations to your script.

The above said, if you do run into a problem, we’ll always do our very best to point you in the right direction via the helpdesk which you can contact online here or by emailing support at blackfoot.co.uk

 
 Share on Facebook Share on Twitter Share on Reddit Share on LinkedIn
1 Comment  comments 
formats

Keep it simple, stupid!

Published on July 2, 2011 by in General

Welcome to our first blog post! Hopefully we will educate, amuse and inspire you in all things related to web hosting.

Our motto since Blackfoot was founded in 1999 has been ‘Simplified Hosting Solutions’ and despite the gargantuan amount of technical knowledge our staff have acquired over the years we still try to keep things simple and as easy as possible for the end user - whatever it might be.

This will be our primary objective when implementing our new Cloud hosting infrastructure - keeping it simple. Most of us don’t want to be concerned with all the technical mumbo jumbo so why confuse everyone with it? You may not even notice when your website is migrated to the cloud but it will mean more hardware redundancy and therefore your technical team more chilled and sleeping better! Maybe we should then change our motto to ‘Simplified Cloud Hosting’?


 Share on Facebook Share on Twitter Share on Reddit Share on LinkedIn
No Comments  comments